I’ve moved to Office 365 for my private mails a while ago and. Up to now, the provider hosting this website was responsible for the DNS entries. But now I moved the entire DNS authority to Microsoft for my primary domain. This lead to the unfortunate incident that I was unable to send mails to GMX (one of the largest free mailer in Germany). Thanks to a tip from Daniel Melanchthon I was able to resolve the issue fairly quickly.
The problem seems to be that GMX checks for the existence of a DNA A record on the sender domains. My primary domain is henningkrause.eu. When I send an email to GMX, they check for an A record for henningkrause.eu. I’m not sure why they do that - I know of no RFC which makes such a record mandatory. The A record is normally only used as a fallback method in case no MX record can be found. The solution was to create such a DNS record using the Office 365 DNS management interface:

The entry in question is the one highlighted in red. The host name "@” specifies that the A record is to be created for the domain itself. The interesting thing is that it is not relevant to which IP address the A record points. It just needs to be there. If you experience the same issues and don’t have your own website, just point it to any IP address.
After I created the domain, I was able to send mails to GMX again almost immediately.
2a5b9e3c-5666-4997-878a-052247463d3e|1|5.0
If you have many RSS feed registrations in Outlook 2007, you may have noticed that at some point newly added RSS feeds start disappearing. They are added successfully, but on the next restart of Outlook, the registration is just gone.
You can work around this by setting the registry key DisableRoaming in HKEY_CURRENT_USER\Software\Microsoft\Office\12.0\Outlook\RSS to 1. If this key is not yet present, create it with a type of DWORD.
You'll have to restart Outlook for the change to take effect.
But be cautious: I don't know which side-effects this registry might have.
81c31e27-6f85-47ad-a152-fcd3f9a4285e|2|4.5
 Technorati:
I got my copy of FinalBuilder a few days ago, and installed it right away. Unfortunately, it crashed the instant I ran it. Turns out, its the licensing scheme they are using. Its broken by the "Data Execution Prevention" feature in Vista which is supposed to protect one from buffer overflows. So you'll need to add the FinalBuilder executables to the exclusion list, like in this screenshot:
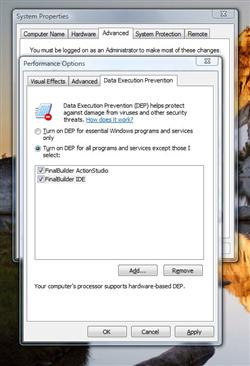
(click to enlarge)
Add the files ActionStudio.exe and FinalBuilder5.exe from the FinalBuilder program directory to the list.
I hope they fix this soon.
f0ae7aba-f71c-4a4e-bd97-531c52c92a45|0|.0
Technorati:
Solution
The default download directory for Internet Explorer is the My Document folder. To change this location, follow these steps:
- Open the registry editor and navigate to HKEY_CURRENT_USER\Software\Microsoft\Internet Explorer.
- Create a new value of type String and name it Download Directory
- Open the new value and enter the new directory.
The result should look like this:

Registy editor with changed default folder for the Internet Explorer (click to enlarge)
dfafb398-07f8-4249-9b3d-09846f674e4a|3|1.7
Technorati:
Zusammenfassung
Am 09.01.2006 habe ich einen Vortrag in der .NET Usergroup Paderborn gehalten. Vorgestellt wurden einige ASP.NET Features und einige der neuen Security Features in .NET 2.0
Inhalt
Die folgenden Themen kommen in dem Vortrag vor:
- ASP.NET Features
- URL Rewriting
- Eigene SitemapProvider
- Caching
- ObjectDatasource
- XML Transformationen mit Extension Objekten
- Mehrsprachigkeit
- Security
- SecureString
- Sichere Passworteingabe
- Passwörter speichern (ProtectedData, ProtectedMemory)
Downloads
5460f951-f8be-416f-aed3-019df24bca4b|0|.0
Technorati:
Symptome
Wird ein Sentinel Dongle über ein Netzwerk benutzt (insbesonders Dial-Up oder VPN Verbindungen), so kann es vorkommen das der Dongle von der Client Applikation nicht nich gefunden wird, obwohl der Dongle auf dem Server eingesteckt ist.
Ursache
Der Sentinel Protection Server bindet sich nicht auf die allgemeine IP Adresse (0.0.0.0/0), sondern explizit auf jede verfügbare IP Adresse und wartet auf UDP Port 6001 auf eingehende Verbindungen.
Ändert sich eine IP Adresse oder wird eine neue Verbindung aufgebaut (z.B. eine VPN Verbindung), bekommt der Sentinel Protection Server dies nicht mit.
Lösung
Bei jeder Änderung von IP Adressen muss der Dienst "Sentinel Protection Server" (SentinelProtectionServer) neu gestartet werden:
1 net stop SentinelProtectionServer
2 net start SentinelProtectionServer
Alternativ kann die angehängte Software benutzt werden. Es handelt sich dabei um einen Windows Dienst, der bei Änderungen an der Netzwerkkonfiguration (neue IP-Adresse oder Aufbau einer DFÜ Verbindung) den in der Konfigurations-Datei angegebenen Dienst neustartet. Um den Sentinel Protection Server neustarten zu lassen, tragen Sie den Dienstnamen "SentinelProtectionServer" in die Konfigurationsdatei NetworkAddressMonitorService.exe.config:
1 <?xmlversion="1.0"encoding="utf-8" ?>
2 <configuration>
3 <configSections>
4 <sectionGroupname="applicationSettings"type="System.Configuration.ApplicationSettingsGroup, System, Version=2.0.0.0, Culture=neutral, PublicKeyToken=b77a5c561934e089" >
5 <sectionname="InfiniTec.NetworkAddressMonitorService.Properties.Settings"type="System.Configuration.ClientSettingsSection, System, Version=2.0.0.0, Culture=neutral, PublicKeyToken=b77a5c561934e089"requirePermission="false" />
6 </sectionGroup>
7 </configSections>
8 <applicationSettings>
9 <InfiniTec.NetworkAddressMonitorService.Properties.Settings>
10 <settingname="ServiceToRestart"serializeAs="String">
11 <value>SentinelProtectionServer</value>
12 </setting>
13 </InfiniTec.NetworkAddressMonitorService.Properties.Settings>
14 </applicationSettings>
15 </configuration>
Downloads
f78891cf-f0f8-453b-8796-6f1cda34bc38|0|.0
Symptoms
After you view an ASP.NET webpage which
displays performance counter data via the PerformanceCounter class, scripts no
longer function. This includes scripts launched from a command line as well as
client-side scripts in any browser window that is opened after you viewed the
original page. Scripts are working again after you have stopped the Word Wide
Publishing service.
Cause
A deadlock occurs because of a bug in one of the WMI providers. An event tracing is done which calls the RegisterTraceGuids API which in turn calls into one of the WMI Service hosted within the Services.exe.
Resolution
A hotfix is available from Microsoft, at least in english and german.
To resolve this problem, contact Microsoft Product Support Services to obtain the hotfix for KB834010. For a complete list of Microsoft Product Support Services phone numbers and information about support costs, visit the following Microsoft Web site: http://support.microsoft.com/default.aspx?scid=fh;[LN];CNTACTMS
Status
This problem was first corrected in Microsoft Windows XP Service Pack 2
Steps to reproduce the problem
- Create a new ASP.NET web application
- Add a label control to the page
- Add this code to the Page_Load event:
1 using (PerformanceCounter counter = new PerformanceCounter())
2 {
3 counter.CategoryName = "Memory";
4 counter.CounterName = "Available MBytes";
5 Label1.Text = counter.NextValue().ToString();
6 }
- Compile the application
Open the webform with Internet Explorer
Now, open any website which has client-side scripting
References
abf5dc5c-d95d-468f-87a1-d5267e006e4d|0|.0
Tags:
performance, counter, asp.net, windows, internet, explorer
Technorati:
performance, counter, asp.net, windows, internet, explorer
Affected products
- Windows XP
- Windows 2003
- MDAC 2.71
- MDAC 2.8
Summary
The MDAC component is a set of components that allow uniform data access to various data sources. These components can become corrupted. This article outline a way to manually repair the MDAC components.
Symptoms
If a program that accesses databases via ADO (ActiveX Data Objects) or similar displays the error message
The specified Procedure was not found
this indicates, that the MDAC installation is damaged.
Additionally, a new installation of the MDAC components does not solve the solution.
Solution
If a reinstallation of the MDAC components does not solve the problem, try the following steps to manually repair the MDAC components:
-
Download the MDAC setup suite in the version that is already installed on your system. It can be found on the Microsoft Download website.
-
Open a command prompt and change to the directory where you saved the file.
-
Type
MDAC_TYP /c /t:<myfolder>
where <myfolder> is a folder on your harddisk, e.g. c:\temp\mdac
-
Change the current folder to <myfolder> and type the following:
md temp
expand mdacxpak.cab temp -f:*.*
-
Cut-and-paste the following code snippet into a text editor and save it as makedirs.cmd in the <myfolder>\temp directory:
@echo off
md ADO
copy /b MSADER15.DLL ADO
copy /b MSADO15.DLL ADO
copy /b MSADO20.TLB ADO
copy /b MSADO21.TLB ADO
copy /b MSADOMD.DLL ADO
copy /b MSADOR15.DLL ADO
copy /b MSADOX.DLL ADO
copy /b MSADRH15.DLL ADO
copy /b MSJRO.DLL ADO
md MSADC
copy /b MSADCE.DLL MSADC
copy /b MSADCER.DLL MSADC
copy /b MSADCF.DLL MSADC
copy /b MSADCFR.DLL MSADC
copy /b MSADCO.DLL MSADC
copy /b MSADCOR.DLL MSADC
copy /b MSADCS.DLL MSADC
copy /b MSADDS.DLL MSADC
copy /b MSADDSR.DLL MSADC
copy /b MSDAPRSR.DLL MSADC
copy /b MSDAPRST.DLL MSADC
copy /b MSDAREM.DLL MSADC
copy /b MSDAREMR.DLL MSADC
copy /b MSDFMAP.DLL MSADC
md "OLE DB"
copy /b MSDADC.DLL "OLE DB"
copy /b MSDAENUM.DLL "OLE DB"
copy /b MSDAER.DLL "OLE DB"
copy /b MSDAORA.DLL "OLE DB"
copy /b MSDAOSP.DLL "OLE DB"
copy /b MSDAPS.DLL "OLE DB"
copy /b MSDASC.DLL "OLE DB"
copy /b MSDASQL.DLL "OLE DB"
copy /b MSDASQLR.DLL "OLE DB"
copy /b MSDATL2.DLL "OLE DB"
copy /b MSDATT.DLL "OLE DB"
copy /b MSDAURL.DLL "OLE DB"
copy /b MSXACTPS.DLL "OLE DB"
copy /b OLEDB32.DLL "OLE DB"
copy /b OLEDB32R.DLL "OLE DB"
copy /b OLEDB32X.DLL "OLE DB"
echo.
echo Finished !!
:eof
-
In your command prompt window, change to the directory where you extracted the cab file.
-
Start the above file by typing
-
The above batch file has now created three directories within the current directory, , MSADC and OLE DB. These three directories must now be placed under the %CommonProgramFiles%\system directory.
-
Now, cut-and-paste the following snippet into a text editor and save it as RegFiles.cmd in the %CommonProgramFiles%\system directory:
@echo off
echo Unregistering DLLs...
for %%a in (ado\*.dll msadc\*.dll "ole db"\*.dll) do regsvr32 /u /s %%a
echo Finished.
echo Reregistering DLLs...
for %%a in (ado\*.dll msadc\*.dll "ole db"\*.dll) do regsvr32 /s %%a
echo Finished.
-
Within your command prompt, change the current directory to %CommonProgramFiles%\system and type the following:
This will de-register the MDAC components and the re-registers them.
References
This solution was taken from the newsgroup microsoft.public.data.ado. The name of the thread was Repair a corrupted MDAC 2.71 installation - the Solution. Many thanks to the author Jens Geyer
e948c4ee-229b-4135-9fed-cc2c7c79c9fc|0|.0
Tags:
mdac, corrupt, manual, repair, kbmdac271, kbmdac28, kbwinxp, kbwin2k3
Technorati:
mdac, corrupt, manual, repair, kbmdac271, kbmdac28, kbwinxp, kbwin2k3
Affected products
- Windows 2003
- Tweak UI for Windows XP/2003
Symptoms
The CSRSS process consumes about 100% of the cpu under certain circumstances, such as opening an Outlook mail folder. Additionally, cascading menus open only with a significant delay.
Solution
One possible cause for this is the Tweak UI tool from Microsoft. This tool exposes a bug in that it sets the MenuShowDelay to zero. In fact, the lowest valid value for this setting is one. To correct this, follow these steps:
-
Open the registry editor.
-
Navigate to the HKEY_CURRENT_USER\Control Panel\Desktop node.
-
Double-Click the MenuShowDelay entry.
-
Set the value of this entry to 1.
-
Close the registry editor.
The changes are loaded the next time you log on to your computer.
More informations
The Tweak-UI tool from Microsoft is a tool to configure several aspects of the user interface from Windows. One of these settings is the delay for cascading menus.
Status
The status of this problem is unknown.
d22782ef-162a-4abe-9e2a-44fe6b9a6527|1|5.0
Affected products
- Windows 2003
- ATI Radeon/FireGL 9000
Symptoms
When the Radeon/FireGL 9000 drivers are installed under Windows 2003, the system produces a STOP 50 (PAGE_FAULT_IN_NON_PAGED_AREA) every time it is restarted.
Workaround
To work around this problem, restart the system in safe mode and remove the video driver. Also, you can use the last good known configuration. After the removal of the driver, restart the system and then set the hardware acceleration of the video adapter to full. To do this, follow these steps:
-
Right-click the desktop and select Properties.
-
Select the Settings tab.
-
Click Advanced.
-
Select the Troubleshoot tab.
-
Move the Hardware acceleration slieder to maximum.
The drivers can now be safely reinstalled.
Status
The status of this problem is unknown, but it seems to be solved in the current driver release.
992728eb-15d8-47a3-b3c0-c938c253cddd|0|.0